Full source code can be found here: https://github.com/jcraane/android-simple-image-cast
By adding Chromecast support to media rich apps like photo- and video players, users can display content to Chromecast enabled devices. This greatly enhances the user experience of those apps.
This post demonstrates how to integrate the Chromecast SDK to add cast support for casting images. The app displays a list of publicly available images using an image carousel. When the user scrolls through those images, the images are cast to a connected receiver.
Prerequisites, setup cast SDK
Before the app can cast images to a Chromecast device, the cast developer SDK must be setup. This includes a one-time fee of 5$.
Execute the following steps to register the application:
- When the developer fee is paid, navigate to the Google Cast SDK Developer Console and register your application. The only required field is the application name, as in the following example:

- To test the application without publishing it, register a Cast Receiver Device. Both receiver and app need to be on the same network.
- Add the applicationId from step 1 to the local.properties file in the root of your project:
cast_app_id=<YOUR_GOOGLE_CAST_SDK_APP_ID>
The app id is retrieved using a resValue configured in the buildType section of the apps build.gradle.kts file.
Implementing the application
Adding support for Chromecast SDK
The first step is to include the dependencies for the cast SDK:
implementation("androidx.mediarouter:mediarouter:1.0.0")
implementation("com.google.android.gms:play-services-cast-framework:17.0.0")
The sample app uses default cast functionality. This section provides a brief overview of the steps required to add cast support to an Android app.
The first step is to register an implementation of the CastOptions interface to the manifest. This initializes the CastContext singleton. The cast application id is required when initializing the cast context. Below is the implementation of the CastOptions interface in the sample app:
public class CastOptionsProvider implements OptionsProvider {

    public CastOptions getCastOptions(Context context) {
        return new CastOptions.Builder()
                .setReceiverApplicationId(context.getString(R.string.cast_app_id))
                .setCastMediaOptions(new CastMediaOptions.Builder().build())
                .build();
    }

    @Override
    public List<SessionProvider> getAdditionalSessionProviders(Context context) {
        return null;
    }

}
The following line registers this implementation in the manifest:
<meta-data
   android:name="com.google.android.gms.cast.framework.OPTIONS_PROVIDER_CLASS_NAME"
   android:value="nl.jcraane.simpleimagecast.cast.CastOptionsProvider" />
Add the cast button, initialize the cast context and show the introductory overlay
The next step is adding the cast button and initialize the cast context. Adding the cast button is done by inflating a menu which contains the cast button. The menu is inflated in the onCreateOptionsMenu function where the menu item is assigned to the mediaRouteMenuItem variable in the activity. The menu item is needed when showing the introductory overlay (more on this later).
override fun onCreateOptionsMenu(menu: Menu?): Boolean {
        super.onCreateOptionsMenu(menu)
        menuInflater.inflate(R.menu.browse, menu)
        mediaRouteMenuItem = CastButtonFactory.setUpMediaRouteButton(
            applicationContext,
            menu,
            R.id.media_route_menu_item
        )
        return true
    }
The cast context is initialized in the onCreate method:
mCastContext = CastContext.getSharedInstance(this)
It is good practice when an application integrates cast to show the user a so-called introductory overlay which introduces the user to the cast function pf your app. The cast SDK provides an IntroductoryOverlay for doing just that:
private fun showIntroductoryOverlay() {
        if (mIntroductoryOverlay != null) {
            mIntroductoryOverlay?.remove()
        }
        if (mediaRouteMenuItem != null && mediaRouteMenuItem?.isVisible() == true) {
            Handler().post {
                mIntroductoryOverlay = IntroductoryOverlay.Builder(
                    this@MainActivity, mediaRouteMenuItem
                )
                    .setTitleText("Introducing Cast")
                    .setSingleTime()
                    .setOnOverlayDismissedListener { mIntroductoryOverlay = null }
                    .build()
                mIntroductoryOverlay?.show()
            }
        }
    }
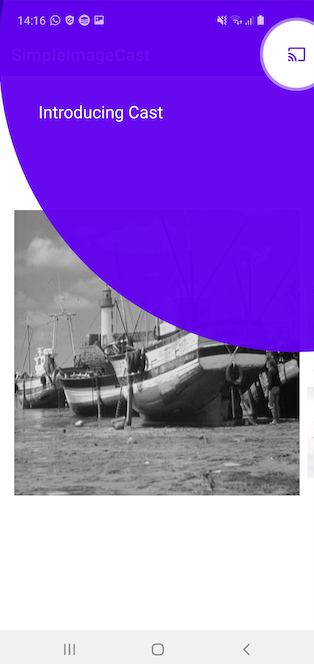
In the above code the menu item (mediaRouteMenuItem) is passed to the IntroductoryOverlay.Builder so the introductory overlay is anchorded to the menu item. The titleText is displayed as text in the overlay and the setSingleTime call makes sure the overlay is only shown once. Below is an example of the introductory overlay in the sample app:
The showIntroductoryOverlay function is called when the CastState changes and there are devices available. This is described in the next section.
Setting up the listeners
There a are a couple of events which are used to get feedback about the state of the cast session. These are the CastStateListener and SessionManagerListener. The CastStateListener is used for monitoring the current CastState. The aforementioned showIntroductoryOverlay is called in the CastStateListener when the state is not equal to CastState.NO_DEVICES_AVAILABLE.
The SessionManagerListener is used for events about the CastSession itself.
When the user taps on the cast button, the onApplicationConnected function is called on the SessionManagerListener. This is the place to obtain an instance of the CastSession which is used to cast actual content to a connected receiver.
private fun onApplicationConnected(castSession: CastSession) {
    mCastSession = castSession
    castImage(images[currentPosition])
    supportInvalidateOptionsMenu()
}
When a CastSession is obtained we can cast actual content to the receiver in the form of a URL. In the example app the current image in the image carousel is cast. This is done by adding a listener to the viewpager and cast the current item (URL of the image) to the device. To cast an actual image the following code is used:
private fun castImage(url: String) {
   mCastSession?.remoteMediaClient?.let { remoteMediaClient ->
      remoteMediaClient.load(
          MediaLoadRequestData.Builder()
              .setMediaInfo(
                  MediaInfo.Builder(url)
                      .setStreamType(MediaInfo.STREAM_TYPE_NONE)
                      .setContentType("image/png")
                      .setMetadata(MediaMetadata(MediaMetadata.MEDIA_TYPE_PHOTO).apply {
                          putString(MediaMetadata.KEY_TITLE, url)
                          addImage(WebImage(Uri.parse(url)))
                      })
                      .build()
              ).build()
      )
   }
}
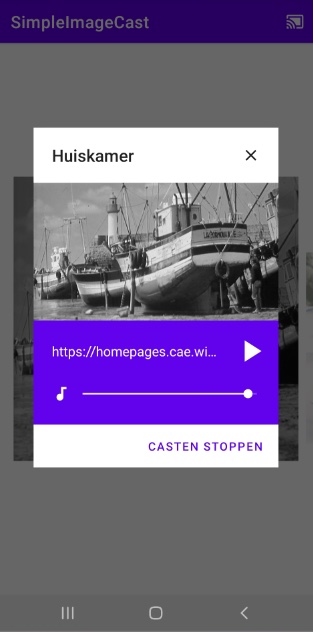
Here we use the load function of the RemoteMediaClient. Extra metadata is supplied to provide an image and title. This is displayed in the dialog which is displayed when the cast button is pressed, and a cast session is in progress (or in the mini player when casting a video and the integrated mini player is used). See the following example:
As a last thing, when cast is enabled, the current displayed image should be cast immediately to the receiver. This is done by calling the castImage function when the onApplicationConnected function is called.
Conclusion
Integrating support for casting media with the Cast SDK is relatively straight forward but requires some steps. This post describes the steps needed to add some basic support for casting images. This can be used as a starting point to explore further.
Resources
- Google Cast SDK Developer Console
- Cast-enable an Android app
- https://github.com/jcraane/android-simple-image-cast